Showing posts with label terrain. Show all posts

Friday, 12 November 2010

A real marsh - of sorts

I thought that I really ought to visit my local marsh since I have only been once and it was covered in snow and frozen solid at the time! I only live about two minutes drive away so it is a bit pathetic that I haven't been before.

It is one of the only remaining sizeable bits of marsh in the Midlands which isn't simply part of a floodplain. It is formed as run off from the nearby hills with the local geology preventing it from draining. There is reckoned to be about 5 foot depth of peat which has accumalated. Man has left his mark on the environment especially through the collection of wood. This has been going on for hundreds and perhaps thousands of years - pre-Roman settlement is known in the area. Without human intervention, wetland in this area tends to be wooded with trees such as alder surrounding numerous bodies of open water. As well as being used for things like clogs, in post-medieval times alder was one source of charcoal for gunpowder making. 
This map is from one of the information boards at the entrance to the marsh. The roughly horizontal line of trees seems, going by a nineteenth century OS map, to be the remains of a hedge line. The area has become more wooded in the last century with the decline of wood gathering though this is one method of keeping the meadows relatively clear...

Mowing machine
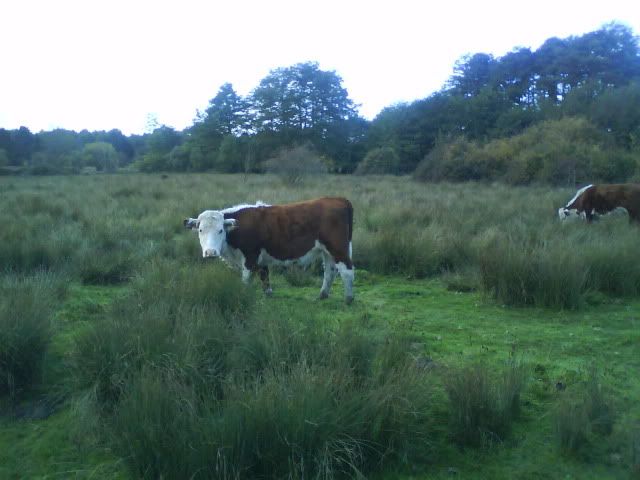
A small herd is maintained on the meadows; they keep down the grass and much of the scrub although the photo shows how much of  even the drier area is covered with low reeds. The herd roams into part of the marsh area as well. I could follow some of their tracks as far as the pond. Parts of the marsh may be too deep for them - the path crosses the main body of the marsh on a duckboard causeway and it looks decidedly wet underfoot. If you ever go - beware. I was wearing army boots and almost ended up pitching into the mire; the duckboards are decidedly slippy!

There are a couple of sizeable areas of open water surrounded by pretty dense reeds and bulrushes. Much of this is pretty tall.
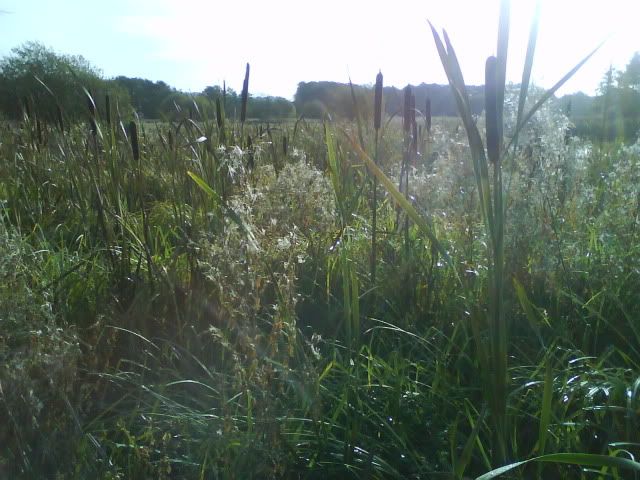
Swampster in the bulrushes.


As for wargaming....
In DBMM terms I think I calculated that the marsh area would qualify as a 1 ME piece. Whether it is wet enough to be 'marsh' in rule terms is debateable though it is certainly far enough away from a river not to count as the marsh allowable adjacent to a water feature. It is certainly at least boggy ground. It did strike me that the rushes would be tall and dense enough to hide light infantry though their presence would likely to be revealed quite quickly if there was any movement.
The wet meadow is much drier (or was when I visited in October, though the autumn had been relatively dry) and might count as either open ground or some kind of rough going.

On a closing note... one of the reasons for the survival of this area of marsh (now an SSSI) was through the work of my father and his colleagues during the expansion of my town. Draining of the area had certainly been considered. He also helped to ensure that the route of the ancient and Roman road was preserved as the area was built up. Thanks, Dad.

Thursday, 14 October 2010

Marsh

I've been concentrating on non-Medieval stuff for the last month or two so I though I'd put this up.
I decided that it would be nice to have a go at making some swampy terrain pieces which could be either boggy ground or marsh in DBMM terms.

I did think about showing a step by step method, but forgot until part way through. I think it is pretty straightforward though.

This one is a trial run to see how it looked. It is a half sized feature for DBMM - roughly 20cm across.

The main base was cut from perspex bought as a sheet from Homebase (about 2' by 4'). This is a bit of a pain to do. Score as deeply as possible with a Stanley knife and then carefully snap away the excess. Experiment - it can easily start to split in the wrong direction. You can alternatively cut it with a bandsaw but the recommended method is to sandwich it between some wood first.


(EDIT: I cut some more today using a cutting wheel on a Dremel type tool. This was much easier (but wear goggles!) Even if you don't cut all the way through the gouge should be enough for an easy snap. The edges are smooth but there is a ridge of cut material most of the way around. This should get covered by the terraforming even if it isn't sanded off).


The perspex is actually a bit matt so needs help to give a water effect. I'm sure shinier stuff is available.


I then sprayed it on the reverse with a chocolate brown aerosol. Spraying helped to avoid brushmarks showing through.

Whn dry, I covered the top with a layer of shellac which I happened to have. This is a transparent darkish brown colour and dries gloss. It gave the colour I wanted and gave a bit more depth to the 'water'.


I then used some brown window sealant to form the dryish land. Read the label - some says it can be painted and some that it can't. Obviously the paintable stuff is wanted. Apparently it is acrylic and the rest is silicone. I found the best method was to splurge an area and the use a wet finger to spread it a bit. Trying to use a wooden spatula left smears which needed cleaning up - in some places this scratched away the shellac.

Next stage was to paint the sealant, though the original colour would have suited.

I then gave a coat of acrylic gloss over the water to give further depth (and cover over the areas where the shellac had been damaged).

When this had dried for 24 hours, I started adding the foliage. I have a whole load of different colours and lengths of Silflor tufts so I placed these first. One of the packs I bought with this marsh in mind was the one which has white and yellow 'flowers' which I thought might work for bog cotton or various wetland flowers.

I also bought some tacky glue called Scatter Grip. This goes on far more precisely than something like Scenic Cement and does hold the static grass very well. A bit of a shine is visible so I might have a go at matting it down in some way. I used Woodland Scenics 'Summer' mix for the majority of the area. I 'm not sure about it at the moment and might go for something shorter, perhaps even scatter rather than static grass.

The perspex does get enough static charge to attract the grass so a wet paint brush is needed to remove some of the excess. I still need to get some of it off!

Friday, 11 September 2009

The Fateful Land

In wargaming there tends to be a payoff between terrain which is attractive and that which is practical for the moving of based figures acoss it. I try to reach a happy medium though this can take a bit of trial and error. Some of my hills are far too steep and troops slide down them like sinners into the inferno :)

I like to try to use some terrain features which are distinctive for an area. This is often the style of building being used. A certain amount of licence can be necessary since manufacturers do not necessarily make houses which exactly match a particular region or time period. Chimneys and windows can often show a building to be from a later period, but beggars can't be choosers.

For Italy I initially went for 10mm Timecast buildings. They are nicely made and based on real examples. I used 10mm because terrain scale is so far out of figure scale that accurately sized buildings for 15mm can be very big, especially churches. 10mm gives a good compromise, allowing a size which isn't too far away from figure scale but which lets you put enough buildings on the table to look like a small built up area.

A common feature of Tuscany and surroundinga areas is the hill top settlement. This shows my attempt at one
The tower was scratchbuilt using textured card from Slaters. The roof was made by texturing some milliput - this took ages!
The hill was made from extruded polystyrene. This is much tougher than the white expanded polystyrene and carves well.
I may well make another at some point, with one side vertical to allow the hill to be placed against the table edge as a part of a larger city. This will also allow a larger area on top for the placement of more buildings with even more levels.
I'm still not sure I like the green building, though I based the colour on a 14th century picture by Fra Angelico.
One reason I'd like to have more area for buildings is that I bought quite a few JR Miniatures buildings from Magister Militum . These are 15mm but, as with many ranges of buildings, they are slightly underscale - especially when most '15mm' figures are now larger.
They fit in very well with the 10mm Timecast buildings:
The three buildings on the left are JR Miniatures. The block on the right is from Timecast.
Another key feature of this landscape is the olive grove. I bought some trees from Realistic Modelling Services.
 As with the buildings, I bought ones which are underscale. This emphasises the difference in height between the olive trees and ones in woods - like most people I use trees which are substantially undersized at perhaps 5 time the height of a figure rather than a more realistic 10 or 20 times taller. I have some poplar trees too, from the model tree shop though I haven't yet based these.
 I scratchbuilt some vines.
These are based on 'tongue depressor' style sticks. I drilled a number of holes along the length and put in some thick wire uprights. Wooden poles would have worked too but I wanted something fairly thin and strong. I then used some Woodland Scenics Fine Leaf Foliage. This comes on twiggy material which can be selected for the most vine like strands. A couple of pieces of this placed horizontally give good cover. I made half a dozen or so of these in about an hour and had loads of the foliage left over. I put them on a piece of painted and textured MDF to show the extent of the vineyard. Sometime I may make some hills with terraces onto which I can put some narrower versions of these strips.